JAVA 쓰레드란(Thread) ? - JAVA에서 멀티쓰레드 사용하기
Step 1 : 멀티 스레드( Multi Thread )의 개념
운영체제(OS)에서 실행 중인 하나의 어플리케이션 즉 ctrl + alt + del창 작업 관리자에서 프로세스 탭에 올라와 있는 어플리케이션 하나를 하나의 프로세스라고 부릅니다. ( Ex) Chrome ) 만약 우리가 크롬창을 더블클릭 누른다면(실행) 운영체제로부터 필요한 메모리를 할당받아 어플리케이션의 코드를 실행하는 것이 프로세스입니다. 크롬을 2개 띄웠다면 두 개의 프로세스가 생성된 것입니다.
멀티 태스킹( Multi Tasking )과 멀티 스레드( Multi Thread )
멀티 태스킹이란 두 가지 이상의 작업을 동시에 처리하는 것을 말합니다. 예를 들어 워드로 문서작업을 하는 동시에 음악을 듣는 것은 OS가 프로세스마다 작업을 병렬로 처리하기에 가능합니다. 멀티 태스킹이 꼭 멀티 프로세스( 워드 + 윈도 플레이어 프로세스 조합 )를 말하는 것은 아닙니다. 한 프로세스 내에서 멀티 태스킹을 할 수 있도록 만들어진 프로세스 예를 들어 메신져 프로세스 같은 경우 채팅 기능을 제공하면서 동시에 파일 업로드 기능을 수행할 수 있습니다. 이처럼 한 프로세스에서 멀티 태스킹이 가능한 이유는 멀티 스레드 ( Multi Thread )덕분 입니다. 멀티 프로세스는 프로세스마다 운영체제로부터 할당받은 고유의 메모리를 서로 침범할 수 없지만 멀티 스레드는 /java/java-jvm/ 포트스에서 확인할 수 있는 것처럼 프로세스 내부에서의 멀티 스레드는 공유되는 자원이 있어 하나의 스레드에서 예외가 발생한다면 프로세스 자체가 종료될 수 있습니다.
Step 2 : Main Thread
모든 자바 어플리케이션은 Main Thread가 main() 메소드를 실행하면서 시작됩니다. 예외는 없습니다. 이러한 Main Thread 흐름 안에서 싱글 스레드가 아닌 멀티 스레드 어플리케이션은 필요에 따라 작업 쓰레드를 만들어 병렬로 코드를 실행할 수 있습니다. 싱글 스레드 같은 경우 메인 스레드가 종료되면 프로세스도 종료되지만, 멀티 스레드는 메인 스레드가 종료되더라도 실행 중인 스레드가 하나라도 있다면 프로세스는 종료되지 않습니다.
Thread 생성
이제 쓰레드를 어떻게 생성하는지 알아보겠습니다. 쓰레드 생성에는 2가지의 방법이 존재합니다.
Thread 클래스로부터 직접 생성
new를 통해 Thread 클래스 객체를 생성 후 start 메서드를 통해 다른 스레드에서 할 작업을 할당하는 방법입니다. Thread객체를 생성할 때는 Runnable 인터페이스를 구현한 클래스 객체를 매개변수로 받습니다.
public class Task implements Runnable {

    @Override
    public void run() {
        int sum = 0;
        for (int index = 0; index < 10; index++) {
            sum += index;
            System.out.println(sum);
        }
        System.out.println( Thread.currentThread() + "최종 합 : " + sum);
    }

}
public static void main(String args[]){
    Runnable task = new Task();
    Thread subTread1 = new Thread(task);
    Thread subTread2 = new Thread(task);
    subTread1.start();
    subTread2.start();
}
1
2
3
4
5
6
7
8
9
10
11
12
13
14
15
16
17
18
19
20
21
22
23
// 결과 ( 스레드가 끝나는 순서는 랜덥입니다. )
0
1
3
6
10
15
21
28
36
45
0
1
3
Thread[Thread-0,5,main]최종 합 : 45
6
10
15
21
28
36
45
Thread[Thread-1,5,main]최종 합 : 45
꼭 Runable을 구현한 객체를 파일로 만들지 않고 익명-구현-객체만들기 포스트 방법처럼 익명 구현 객체로 만들어 간단하게 실행 가능합니다.
public static void main(String args[]){
    Runnable task = new Runnable() {
        public void run() {
            int sum = 0;
            for (int index = 0; index < 10; index++) {
                sum += index;
                System.out.println(sum);
            }
            System.out.println( Thread.currentThread() + "최종 합 : " + sum);
        }
    };
    Thread subTread1 = new Thread(task);
    Thread subTread2 = new Thread(task);
    subTread1.start();
    subTread2.start();
}
더 간단한 방법은 람다식을 통해 익명 구현 객체를 구현하는 것입니다. 추후 람다식 포스트를 통해 자세히 소개하겠습니다.
public static void main(String args[]){
    Runnable task = ()-> {
        int sum = 0;
        for (int index = 0; index < 10; index++) {
            sum += index;
            System.out.println(sum);
        }
        System.out.println( Thread.currentThread() + "최종 합 : " + sum);
    };

    Thread subTread1 = new Thread(task);
    Thread subTread2 = new Thread(task);
    subTread1.start();
    subTread2.start();
}
Thread 하위 클래스로부터 생성
스레드가 실행할 작업을 Runable 구현클래스 대신 Thread를 상속한 새로운 클래스를 정의하여 run 메소드를 Overriding 하는 방법입니다. 혹은 코드를 단순히 하기 위해 Thead 익명 객체로 작업 스레드 객체를 생성할 수 있습니다.
// Thread클래스를 상속한 클래스
public class CustomThread extends Thread {

    @Override
    public void run() {
        int sum = 0;
        for (int index = 0; index < 10; index++) {
            sum += index;
            System.out.println(sum);
        }
        System.out.println( Thread.currentThread() + "최종 합 : " + sum);

    }
}
public static void main(String args[]){
    Thread subTread1 = new CustomThread();

    // 익명 객체 생성
    Thread subTread2 = new Thread() {
        public void run() {
            int sum = 0;
            for (int index = 0; index < 10; index++) {
                sum += index;
                System.out.println(sum);
            }
            System.out.println( Thread.currentThread() + "최종 합 : " + sum);
        }
    };

    subTread1.start();
    subTread2.start();
}
데몬 스레드
데몬 스레드는 메인 스레드의 작업을 돕는 보조적인 역할을 수행하는 스레드로 주 스레드가 종료되면 데몬 스레드 더는 존재 의미가 없기에 강제로 종료됩니다. 워드의 자동 저장 기능을 예로 들을 수 있습니다. 데몬 스레드를 만드는 방법은 스레드를 만들고 해당 스레드에 setDaemon(true); 메소드를 세팅하는 것입니다.
public static void main(String args[]){
    Thread deamon = new Thread(()->{
        while ( true ) {
            System.out.println(" 데몬 스레드가 실행 중입니다.");
            try {
                Thread.sleep(1);
            } catch (InterruptedException e) {
                // TODO Auto-generated catch block
                e.printStackTrace();
            }
        }
    });

    deamon.setDaemon(true);
    deamon.start();

     try {
        Thread.sleep(10);
    } catch (InterruptedException e) {
        // TODO Auto-generated catch block
        e.printStackTrace();
    }
}
1
2
3
4
5
6
7
8
9
10
11
12
// 결과
 데몬 스레드가 실행 중입니다.
 데몬 스레드가 실행 중입니다.
 데몬 스레드가 실행 중입니다.
 데몬 스레드가 실행 중입니다.
 데몬 스레드가 실행 중입니다.
 데몬 스레드가 실행 중입니다.
 데몬 스레드가 실행 중입니다.
 데몬 스레드가 실행 중입니다.
 데몬 스레드가 실행 중입니다.

// while(true) 지만 Main Thread가 종료됨에 따라 자동 종료됨
Thread 이름 생성
기본 스레드는 thread.getName()을 통해 Thread-n이라는 이름을 가지고 올 수 있습니다. 하지만 조금 더 수월한 디버깅을 위해 thread.setName(“스레드 이름”)을 통해 스레드의 이름을 설정할 수 있습니다.
public static void main(String args[]){
    Thread subTread1 = new CustomThread();
    Thread subTread2 = new Thread() {
        public void run() {
            int sum = 0;
            for (int index = 0; index < 10; index++) {
                sum += index;
                System.out.println(sum);
            }
            System.out.println( Thread.currentThread().getName() + "최종 합 : " + sum);
        }
    };
    subTread1.setName("스레드 1번입니다.");
    subTread2.setName("스레드 2번입니다.");
    subTread1.start();
    subTread2.start();
}
1
2
3
// 출력
스레드 1번입니다.최종 합 : 45
스레드 2번입니다.최종 합 : 45
Step 3 : Thread 우선순위
동시성과 병렬성
멀티 스레드는 동시성( Concurrency ) 또는 병렬성( Parallelism )으로 실행됩니다. 동시성이랑 멀티작업을 위해 1개의 코어로 스레드마다 돌아가면서 조금씩 실행하지만, 너무 빨라 사람의 눈에 보기에는 독립적으로 돌아가는 것처럼 보이는 것을 말하며 병렬성이란 스레드마다 각각의 독립적인 Core가 할당되어 독립적인 Core에서 작업이 이루어지는 것을 말합니다. 코어의 수보다 스레드의 수가 작으면 각각의 코어로 병렬성이 보장되지만 스레드의 개수가 코어보다 많은 경우 스레드를 어떤 순서에 의해 동시적으로 실행할 것인가를 결정해 주어야 합니다. 이것을 스레드 스케줄링이라 합니다. 이런 스케쥴링 방식은 우선순위( Priority ) 방식과 순환 할당( Round-Robin ) 방식으로 나누어집니다.
우선순위( Priority ) 방식
우선순위가 높은 스레드가 실행을 더 많이 하도록 스케줄링하는 방법입니다. thread.setPriority(1) // 1 - 우선순위가 가장 낮음 , 10 - 가장 높음 thread .setPriority(Thread.MAX_PRIORITY); // 직관적 코드 MAX_PRIORITY, NORM_PRIORITY, MIN_PRIORITY
순환 할당( Round-Robin ) 방식
시간 할당량을 정해서 하나의 스레드를 정해진 시간만큼만 실행하는 방법입니다. 해당 방식은 JVM안에서 이루어지기 때문에 개발자가 제어할 수 없습니다.
실질적으로 해당 작업을 다루어 본적은 없어 테스트 코드는 생략하겠습니다.
Step 4 : 동기화 메소드 또는 동기화 블록
멀티스레드 환경에서의 문제는 스레드들이 객체를 공유하며 작업하는 경우가 생기기 때문에 A스레드와 B스레드가 공유하는 객체가 서로의 작업에 영향을 미치면 안 되기 때문에 이를 방지하는 방법으로 동기화 메소드와 동기화 블록 방법이 있습니다. 아래 코드는 서로에게 영향을 미쳐 원하는 결과를 가지고 오지 못하는 경우입니다. thred1 에서 예상하는 값은 100을 가지고 오는 것입니다.
// 공유 객체
public class ShareThread {
    private int value = 0;

    public void setValue( int value ) {
        this.value = value;
        try {
            Thread.sleep(2000);
        } catch (Exception e) {
        }
        System.out.println(Thread.currentThread().getName() + "의 Value 값은 " + this.value +"입니다.");

    }

    public int getValue() {
        return value;
    }
}
public static void main(String args[]){
    ShareThread shareTread = new ShareThread();
    Thread thred1 = new Thread(()->{
        shareTread.setValue(100);

    });

    Thread thred2 = new Thread(()->{
        shareTread.setValue(10);
    });
    thred1.setName("스레드 1");
    thred2.setName("스레드 2");
    thred1.start();
    thred2.start();
}
1
2
3
// 결과
스레드 2의 Value 값은 10입니다.
스레드 1의 Value 값은 10입니다.
동기화 메소드 또는 동기화 블록 코드
스레드가 사용 중인 객체를 Lock을 걸어 해당 작업을 진행하는 Thread가 작업을 마칠 때까지 다른 쓰레드가 작업을 하지 못하게 하는 방법입니다. 메소드 선언에 synchronized를 붙이던가 ( 동기화 메소드 ) synchronized( 공유객체 ) { 작업 } 인 동기화 블록을 사용하면 됩니다.
// 동기화 메소드
public synchronized void setValue( int value ) {
    this.value = value;
    try {
        Thread.sleep(2000);
    } catch (Exception e) {
    }
    System.out.println(Thread.currentThread().getName() + "의 Value 값은 " + this.value +"입니다.");
}

// 동기화 블록
public  void setValue( int value ) {
    synchronized ( this ) {
        this.value = value;
        try {
            Thread.sleep(2000);
        } catch (Exception e) {
        }
        System.out.println(Thread.currentThread().getName() + "의 Value 값은 " + this.value +"입니다.");
    }
}
하지만 Synchronized 키워드를 너무 남발하면 오히려 프로그램 성능저하를 일으킬 수 있기 때문에 적재 적소에 잘 사용해야 합니다.
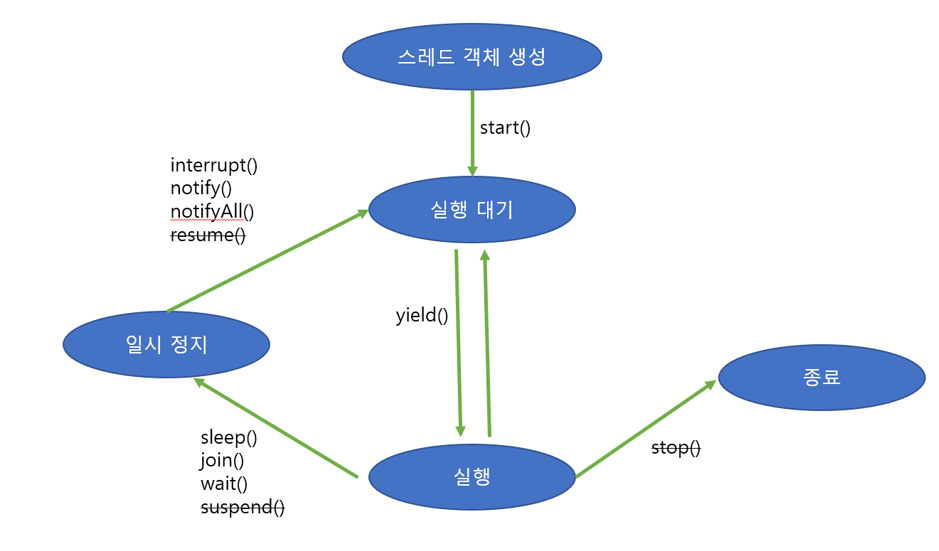
Step 5 : 스레드 상태
스레드로 객체를 생성하면 우선 실행 대기 상태로 들어갑니다. 실행대기상태란 아직 스케쥴링 전 즉 코어에서 작업을 할당받지 못한 상태입니다. 실행 대기 상태에 있는 스레드 중 스레드 스케쥴링으로 선택된 스레드가 CPU를 점유하고 run()을 실행합니다. 이때 CPU를 점유하고 있는 상태를 실행상태입니다. 아직 run()메소드가 끝나지 않아도 스레드 스케쥴링에 의해 다시 실행 대기 상태로 돌아가며 번갈아 가면서 내용을 끝낼 때까지 지속합니다. 경우에 따라 run중인 쓰레드를 일시 정지 시킬 수도 있는데 예제에서 많이 보았던 sleep() 메서드와 같은 경우입니다. 일시 정지 후에는 다시 실행 대기 상태로 갑니다.
스레드 상태 제어
실행 중인 스레드 상태를 변경하는 것을 스레드 상태 제어라고 합니다. 멀티 프로그램을 만들기 위해서는 정교한 스레드 상태 제어가 필요합니다. 상태를 제어하는 메소드는 아래 그림과 같습니다. 취소선을 가지는 메소드들은 스레드의 안정성을 해칠 수 있다고 하여 더는 사용하지 않도록 권장되는 Deprecated 메소드들 이기 때문에 사용하지 않는 것이 좋습니다.
 스레드 상태제어에 관해서는 필자가 스레드에 관해 아직 단순한 작업만 하여 머리로 체득한 상태가 아니라 좀 더 알게 된다면 해당 부분 수정하겠습니다.
Step 6 : 스레드 그룹
스레드 그룹이란 느낌이 오듯이 관련된 스레드를 그룹으로 묶어서 한 번에 관리하겠다는 목적으로 이용됩니다. 스레드 그룹이 제공하는 다양한 메소드를 통해서 그룹을 제어합니다. 아래 예제코드는 myGroup이라는 스레드 그룹을 만들고 interrupt()를 통해 해당 그룹에 속하는 모든 thread를 중지시키는 예제입니다.
public static void main(String args[]){
    ThreadGroup root = new ThreadGroup("Root_Group");
    ThreadGroup groupChild = new ThreadGroup( root,"myGroup" );

    // root 그룹에 세팅
    Thread root_group = new Thread( root, ()->{
        while ( true ) {
            System.out.println("Root 그룹입니다.");
            try {
                Thread.sleep(1);
            } catch (InterruptedException e) {
                System.out.println("Root 그룹 스레드가 종료됩니다.");
                break;
            }
        }
    });
    // groupChild 그룹에 세팅
    Thread child_group1 = new Thread( groupChild, ()->{
        while ( true ) {
            System.out.println("child_group 그룹의 child_group1입니다.");
            try {
                Thread.sleep(1);
            } catch (InterruptedException e) {
                System.out.println("child_group 그룹의 child_group1 종료됩니다.");
                break;
            }
        }
    });

    // groupChild 그룹에 세팅
    Thread child_group2 = new Thread( groupChild, ()->{
        while ( true ) {
            System.out.println("child_group 그룹의 child_group2입니다.");
            try {
                Thread.sleep(1);
            } catch (InterruptedException e) {
                System.out.println("child_group 그룹의 child_group2 종료됩니다.");
                break;
            }
        }
    });

    root_group.start();
    child_group1.start();
    child_group2.start();


    try {
        Thread.sleep(5);
    } catch (InterruptedException e) {
        // TODO Auto-generated catch block
        e.printStackTrace();
    }

    //groupChild그룹 일괄 중지
    System.out.println("======= groupChild 일괄 중지 =======");
    groupChild.interrupt();

    try {
        Thread.sleep(5);
    } catch (InterruptedException e) {
        // TODO Auto-generated catch block
        e.printStackTrace();
    }


    //root그룹 일괄 중지
    System.out.println("======= root 일괄 중지 =======");
    root.interrupt();
}
1
2
3
4
5
6
7
8
9
10
11
12
13
14
15
16
17
18
19
20
21
22
// 결과
Root 그룹입니다.
child_group 그룹의 child_group1입니다.
child_group 그룹의 child_group2입니다.
child_group 그룹의 child_group2입니다.
Root 그룹입니다.
child_group 그룹의 child_group1입니다.
child_group 그룹의 child_group2입니다.
child_group 그룹의 child_group1입니다.
Root 그룹입니다.
child_group 그룹의 child_group1입니다.
Root 그룹입니다.
child_group 그룹의 child_group2입니다.
======= groupChild 일괄 중지 =======
child_group 그룹의 child_group2 종료됩니다.
child_group 그룹의 child_group1 종료됩니다.
Root 그룹입니다.
Root 그룹입니다.
Root 그룹입니다.
======= root 일괄 중지 =======
Root 그룹입니다.
Root 그룹 스레드가 종료됩니다.
Step 7 : 스레드풀
스레드풀 생성
지금까지 스레드를 만드는 방법에 대해 알아보았습니다. 이제 스레드를 통해 병렬 작업 처리가 많아진 스레드를 효율적으로 처리하는 방법에 대해 알아보겠습니다. 스레드가 기하급수적으로 늘어난다면 스레드 생성과 스케줄링으로 인해 CPU의 메모리 사용량이 늘어나고 어플리케이션의 성능의 저하가 일어납니다. 병렬작업의 급증을 막기 위해서는 특정 스레드 개수 + 작업 컨베이어 벨트 ( 작업 큐 )를 만들어 놓고 작업을 컨베이어 벨트에 올려놓아 작업이 끝난 스레드가 컨베이어에서 작업을 꺼내 기능을 수행하는 방식으로 작업을 구성한다면 분업화로 인한 업무효율이 향상 될 수 있습니다. 아무리 작업 처리 요청이 폭주하여도 스레드의 전체 개수가 늘어나지 않기 때문에 어플리케이션의 성능이 급격하게 저하되지 않습니다. 자바는 스레드 풀을 생성하고 사용할 수 있도록 java.utile.concurrent.ExecutorService 인터페이스와 Executors 클래스 메소드 중 newCachedThreadPool과 newFixedThreadPool 메소드를 제공하고 있습니다.
// 스레드 풀 생성
//1. 자동으로 스레드 수 생성
ExecutorService executorServiceWithCached = Executors.newCachedThreadPool();

//2. 원하는 개수만큼 생성
ExecutorService executorServiceWithNum = Executors.newFixedThreadPool(2);

//3. 최대치로 생성
ExecutorService executorServiceWithMax = Executors.newFixedThreadPool(Runtime.getRuntime().availableProcessors());

//4. 완전 수동
// ThreadPoolExecutor( 코어 스레드 수, 최대 스레드 개수, 놀고 있는 시간, 놀고있는 시간 단위, 작업 큐 )
ExecutorService executorServiceWithCustom = new ThreadPoolExecutor(3, 100, 120L, TimeUnit.SECONDS, new SynchronousQueue<Runnable>());
스레드풀 종료
스레드풀의 스레드는 데몬스레드가 아니므로 main이 종료되더라도 작업을 처리하기 위해 계속 실행상태로 남아있습니다. 때문에 어플리케이션을 종료할 때는 해당 스레드풀을 종료시켜 스레드풀 안의 스레드를 종료상태가 되도록 처리해야 합니다.
// 1. 작업 큐에 대기하고 있는 모든 작업이 끝난 뒤 스레드를 종료한다.
executorServiceWithCached.shutdown();

// 2. 당장 중지한다. 리턴값은 작업큐에 남아있는 작업의 목록이다.
List<Runnable> runable = executorServiceWithCached.shutdownNow();

// 3. 작업은 대기 하지만 모든 작업처리를 특정 시간안에 하지 못하면 작업중인 스레드를 중지하고 false를 리턴한다. 아래는 100초 설정
try {
    boolean isFinish = executorServiceWithCached.awaitTermination(100, TimeUnit.SECONDS);
} catch (InterruptedException e) {
    // TODO Auto-generated catch block
    e.printStackTrace();
}
작업의 생성
Runable 또는 Callable 구현 클래스로 작업을 생성합니다. 둘의 차이는 작업이 끝난 후 리턴 값이 있냐 없느냐의 차이입니다.
// Runable 구현 객체 ( 익명구현객체 사용  )
Runnable task1 = ()-> {
    for (int index = 0; index < 10; index++) {
        System.out.println("작업 중입니다.");
        try {
            Thread.sleep(10);
        } catch (InterruptedException e) {
            e.printStackTrace();
        }
    }
};

// Callable 구현
Callable<Boolean> task2 = () ->{
    Boolean isFinish = true;

    for (int index = 0; index < 10; index++) {
        System.out.println("작업 중입니다. Call");
        try {
            Thread.sleep(10);
        } catch (InterruptedException e) {
            e.printStackTrace();
        }
    }

    return isFinish;
};
작업처리 요청
task를 컨베이어 벨트에 올리는 작업입니다. 즉 작업큐에 위 task객체를 넣는 것입니다.
// 1. 리턴 값이 없는 단순 Runnable를 처리합니다.
executorServiceWithCached.execute(task1);

// 2. 리턴 가능한 Callable도 넣을 수 있는 메서드 입니다.
Future<Boolean> returnBoolean =  executorServiceWithCached.submit(task2);

try {
    System.out.println("끝났습니까 : " + returnBoolean.get());
} catch (Exception e) {
}
execute와 submit의 차이는 return을 받느냐 못 받느냐의 차이 추가로 execute()는 작업 도중 오류 발생 시 오류가 난 스레드를 스레드풀에서 제거하지만 submit()은 오류가 발생하여도 해당 스레드를 재사용합니다.
작업완료 통보
submit()은 task 작업을 작업큐에 넣고 바로 Futrue객체를 리턴합니다. 해당 객체의 get()메서드를 호출하면 호출한 순간부터 스레드가 작업을 완료할 때까지 대기하고 있다가 완료된 후 결과를 받아옵니다.
public static void main(String args[]){
    // 스레드 풀 생성
    //자동으로 스레드 수 생성
    ExecutorService executorServiceWithCached = Executors.newCachedThreadPool();

    // Runable 구현 객체 ( 익명구현객체 사용  )
    Runnable task1 = ()-> {
        for (int index = 0; index < 100; index++) {
            System.out.println("작업 중입니다.");
            try {
                Thread.sleep(10);
            } catch (InterruptedException e) {
                e.printStackTrace();
            }
        }
    };

    // Callable 구현
    Callable<Boolean> task2 = () ->{
        Boolean isFinish = true;

        for (int index = 0; index < 100; index++) {
            System.out.println("작업 중입니다. Call");
            try {
                Thread.sleep(10);
            } catch (InterruptedException e) {
                e.printStackTrace();
            }
        }

        return isFinish;
    };

    // 1. 리턴 값이 없는 단순 Runnable를 처리합니다.
    executorServiceWithCached.execute(task1);

    // 2. 리턴 가능한 Callable도 넣을 수 있는 메서드 입니다.
    Future<Boolean> returnBoolean =  executorServiceWithCached.submit(task2);

    // main스레드의 작업이 멈추지 않기 위해 새로운 스레드로 구성
     executorServiceWithCached.execute(()->{
        try {
            if( returnBoolean.get() ) {
                System.out.println("작업이 완벽히 끝났습니다. ");
            } else {
                System.out.println("작업이 끝나지 못했습니다.");
            }
        } catch (Exception e) {
        }
    });

    // main스레드의 작업이 멈추지 않기 위해 새로운 스레드로 구성
    executorServiceWithCached.execute(()->{
        try {
            // 만약 특정 시간 내에 끝났는지 확인하려는 경우
            if( returnBoolean.get(1,TimeUnit.SECONDS) ) {
                System.out.println("작업이 완벽히 끝났습니다. ");
            }
        } catch (Exception e) {
            System.out.println("작업이 시간내에 끝나지 못했습니다.");
        }
    });

    // 작업 큐에 대기하고 있는 모든 작업이 끝난 뒤 스레드를 종료한다.
    executorServiceWithCached.shutdown();
}
작업처리 결과를 외부 객체에 저장
상황에 따라 스레드가 작업한 결과를 외부 공유 객체에 저장하고 추후 합산하여 저장하는 경우가 있을지도 모릅니다. 예를 들어 쓰레드 1은 1~100까지의 합을 쓰레드 2는 101~200까지의 합을 구하여 두 결과를 합산하는 예를 구현해 보겠습니다. 외부객체 주입은 Runable 인터페이스를 구현하는 클래스를 정의하고 생성자에서 주입 받는 형식으로 진행하겠습니다.
public class FirstThread implements Runnable {

    ResultShare resultShare;

    //공유객체 외부에서 주입.
    public FirstThread ( ResultShare resultShare ) {
        this.resultShare = resultShare;
    }

    @Override
    public void run() {
        int result = 0;
        for (int index = 1; index <= 100; index++) {
            result += index;
            try {
                Thread.sleep(10);
            } catch (InterruptedException e) {
                // TODO Auto-generated catch block
                e.printStackTrace();
            }
        }
        System.out.println("1~100까지의 합은 " + result +"입니다.");
        resultShare.sum(result);
        resultShare.showSum();
    }

}
public class SecondThread implements Runnable {

    ResultShare resultShare;

    //공유객체 외부에서 주입.
    public SecondThread ( ResultShare resultShare ) {
        this.resultShare = resultShare;
    }

    @Override
    public void run() {
        int result = 0;
        for (int index = 101; index <= 200; index++) {
            result += index;
        }
        System.out.println("101~200까지의 합은 " + result +"입니다.");
        resultShare.sum(result);
        resultShare.showSum();
    }

}
public class ResultShare {
    private int result;

    public int sum( int number ) {
        return result+=number;
    }

    public void showSum() {
        System.out.println(" 지금 저장된 값은 : " + result + "입니다.");
    }

    public int getResult() {
        return result;
    }
}
public static void main(String args[]){
    // 스레드 풀 생성
    //자동으로 스레드 수 생성
    ExecutorService executorServiceWithCached = Executors.newCachedThreadPool();

    ResultShare resultShare = new ResultShare();

    Runnable task1 = new FirstThread(resultShare);
    Runnable task2 = new SecondThread(resultShare);

    // Runable이라도 작업이 끝난 후 Future<리턴 객체>로 무엇을 받을 지 임의로 정할 수 있다. run()의 리턴값으로 아무 값이 없더라도 종료 후에 아무 원하는 객체를 이런 식으로 리턴할 수 있다.
    Future<ResultShare> future1 =  executorServiceWithCached.submit( task1, resultShare );
    Future<ResultShare> future2 =  executorServiceWithCached.submit( task2, resultShare );

    // main스레드의 작업이 멈추지 않기 위해 새로운 스레드로 구성
    executorServiceWithCached.execute(()->{
        try {
            ResultShare temp = future1.get();
            temp = future2.get();
           System.out.println("쓰레드 합산이 끝났습니다. 최종 결과는 : " + resultShare.getResult());
        } catch (Exception e) {
        }
    });

    // 작업 큐에 대기하고 있는 모든 작업이 끝난 뒤 스레드를 종료한다.
    executorServiceWithCached.shutdown();
}
1
2
3
4
5
6
7
// 실행 결과
101~200까지의 합은 15050입니다.
 지금 저장된 값은 : 15050입니다.

1~100까지의 합은 5050입니다.
 지금 저장된 값은 : 20100입니다.
쓰레드 합산이 끝났습니다. 최종 결과는 : 20100
작업 완료 순으로 통보
일반적으로 작업 순서대로 처리가 완료되는 것이 아니기 때문에 끝나는 것은 랜덤입니다. 여러 개의 작업이 차례대로 처리될 필요가 없고 처리 결과도 차례대로 이용할 필요가 없다면 CompletionService 인터페이스를 구현한 ExecutorCompletionService 클래스를 사용하면 됩니다. 사용 방법은 아래와 같습니다.
public static void main(String args[]){
    // 스레드 풀 생성
    //자동으로 스레드 수 생성
    ExecutorService executorServiceWithCached = Executors.newFixedThreadPool(Runtime.getRuntime().availableProcessors());

    ResultShare resultShare = new ResultShare();

    Runnable task1 = new FirstThread(resultShare);
    Runnable task2 = new SecondThread(resultShare);

    Future<ResultShare> future1 =  executorServiceWithCached.submit( task1, resultShare );
    Future<ResultShare> future2 =  executorServiceWithCached.submit( task2, resultShare );

    // 각각의 테스트들의 리턴 결과의 객체를 <ResultShare> 안에 적어줍니다.
    CompletionService<ResultShare> compliCompletionService = new ExecutorCompletionService<ResultShare>(executorServiceWithCached);

    executorServiceWithCached.submit(()->{
        // 작업 최종 통보가 올때까지 while 문을 통해 대기합니다.
        while(true) {
            try {
                // 작업이 끝난 결과를 받아온다.
                Future<ResultShare> take = compliCompletionService.take();
                ResultShare result = take.get();

                System.out.println("지금 까지의 합산은 " + result.getResult() + "입니다.");
            } catch ( Exception e) {
                break;
            }
        }
    });

    // 3초 뒤 스레드 강제 중지
    try {
        Thread.sleep(3000);
        executorServiceWithCached.shutdownNow();
    } catch (InterruptedException e) {
    }
}
1
2
3
4
5
6
// 결과

101~200까지의 합은 15050입니다.
 지금 저장된 값은 : 15050입니다.
1~100까지의 합은 5050입니다.
 지금 저장된 값은 : 20100입니다.
콜백 방식의 통보
이번에는 while통해 지속적으로 관찰하는 것이 아닌 Callback 방식을 이용하여 작업 완료를 통보받는 방법에 대해 알아보겠습니다. 콜백이란 작업이 끝나면 실행될 것을 미리 정의해 놓고 작업이 끝나는 순간 이어받아 call한다고 보면 됩니다. 콜백이 정의된 CompletionHandler를 사용해보겠습니다.
public class ResultShare {
    private int result;
    //<결과 타입, 첨부타입>
    private static CompletionHandler<ResultShare, String> completionHandler = new CompletionHandler<ResultShare, String>() {

        //실패 시 할 일
        @Override
        public void failed(Throwable exc, String attachment) {
            System.out.println("실패하였습니다.");
        }

        //성공 시 할 일
        @Override
        public void completed(ResultShare result, String attachment) {
             System.out.println("지금까지의 저장된 합은 " + result.getResult() + "입니다.");
        }
    };

    public int sum( int number ) {
        return result+=number;
    }

    public void showSum() {
        System.out.println(" 지금 저장된 값은 : " + result + "입니다.");
    }

    public int getResult() {
        return result;
    }

    public static CompletionHandler<ResultShare, String> getCompletionHandler() {
        return completionHandler;
    }
}
public class FirstThread implements Runnable {

    ResultShare resultShare;

    //공유객체 외부에서 주입.
    public FirstThread ( ResultShare resultShare ) {
        this.resultShare = resultShare;
    }

    @Override
    public void run() {
        int result = 0;
        for (int index = 1; index <= 100; index++) {
            result += index;
        }
        System.out.println("1~100까지의 합은 " + result +"입니다.");
        resultShare.sum(result);

        // 끝난 후 성공 콜백 실행
        resultShare.getCompletionHandler().completed(resultShare, null);
    }
}
public class SecondThread implements Runnable {

    ResultShare resultShare;

    //공유객체 외부에서 주입.
    public SecondThread ( ResultShare resultShare ) {
        this.resultShare = resultShare;
    }

    @Override
    public void run() {
        int result = 0;
        for (int index = 101; index <= 200; index++) {
            result += index;
        }
        System.out.println("101~200까지의 합은 " + result +"입니다.");
        resultShare.sum(result);
        // 끝난 후 콜백 실행
        resultShare.getCompletionHandler().completed(resultShare, null);
    }
}
public static void main(String args[]){
    // 스레드 풀 생성
    //자동으로 스레드 수 생성
    ExecutorService executorServiceWithCached = Executors.newFixedThreadPool(Runtime.getRuntime().availableProcessors());

    ResultShare resultShare = new ResultShare();

    Runnable task1 = new FirstThread(resultShare);
    Runnable task2 = new SecondThread(resultShare);

    Future<ResultShare> future1 =  executorServiceWithCached.submit( task1, resultShare );
    Future<ResultShare> future2 =  executorServiceWithCached.submit( task2, resultShare );

    executorServiceWithCached.shutdown();
}
참고자료
– 이것이 자바다 (한빛 미디어)
댓글남기기